NAT Overview
NAT policies instruct the firewall to substitute a specified address for existing addresses in a packet as it moves through the firewall. The need to change addresses can be driven by security and/or network integration reasons. NAT processing is separate from the firewall's security engine. NAT policies might change a packet's address, but the security engine of the firewall must have a Security policy allowing it through. Both IPv4 and IPv6 addresses can be changed via NAT policy.
Palo Alto Networks firewall NAT policies consist of matching conditions describing the traffic to NAT and an action describing the precise address substitution desired. The actions generally address source and destination address changes separately but can be combined in the same NAT policy.
A complete discussion of NAT functionality and its implementation on Palo Alto Networks firewalls is found on this link.
Security policies allowing traffic with NAT address changes must be created with these changes borne in mind. The processing order of the Palo Alto Networks firewall includes Security policy examination before NAT address changes are carried out. Thus Security policies for traffic with NAT changes should be written with pre-NAT addresses. Security policies also include source and destination zone matching conditions. The firewall processing of NATs will calculate destination zones based on the final destination address resulting from NAT. Therefore, its Security policy must include the calculated destination zone, which often leads to counter-intuitive Security policies in which pre-NAT destination addresses appear alongside post-NAT destination zones.
NAT examples reviewing this requirement and others can be found on this link.


You also need to add a static default route by going to Network > Virtual Routers > click LAB-VR > Static Routes > Add.

Type the static route name > type 0.0.0.0/0 under Destination > choose ethernet1/1 under Interface > click IP Address for Next Hop > type the next hop IP address (108.81.248.146 in this case) > click OK.


You can also run the built-in Internet Information Services (IIS) (in Windows 7) by going to Control Panel > Programs > Turn Windows features on or off (takes a while to open) > click Internet Information Services (takes a while again to enable).


I've simulated a host on the UNTRUST zone and used a public IP address of 108.81.248.146/29. I also created a hostfile to resolve DNS on your PC by opening Notepad (right-click and Run as Administrator) > under File Name type: C:\Windows\System32\Drivers\etc\hosts > Open


You can view successful Inbound traffic (UNTRUST-L3 to TRUST-L3 zone) under Monitor > Logs > Traffic. Notice there was a hit on the Inbound Security rule (INTERNET-TO-WEB-SERVER).


NAT policies instruct the firewall to substitute a specified address for existing addresses in a packet as it moves through the firewall. The need to change addresses can be driven by security and/or network integration reasons. NAT processing is separate from the firewall's security engine. NAT policies might change a packet's address, but the security engine of the firewall must have a Security policy allowing it through. Both IPv4 and IPv6 addresses can be changed via NAT policy.
Palo Alto Networks firewall NAT policies consist of matching conditions describing the traffic to NAT and an action describing the precise address substitution desired. The actions generally address source and destination address changes separately but can be combined in the same NAT policy.
A complete discussion of NAT functionality and its implementation on Palo Alto Networks firewalls is found on this link.
Security policies allowing traffic with NAT address changes must be created with these changes borne in mind. The processing order of the Palo Alto Networks firewall includes Security policy examination before NAT address changes are carried out. Thus Security policies for traffic with NAT changes should be written with pre-NAT addresses. Security policies also include source and destination zone matching conditions. The firewall processing of NATs will calculate destination zones based on the final destination address resulting from NAT. Therefore, its Security policy must include the calculated destination zone, which often leads to counter-intuitive Security policies in which pre-NAT destination addresses appear alongside post-NAT destination zones.
NAT examples reviewing this requirement and others can be found on this link.
For Destination NAT, I’ve configured a static
public IP address of 108.81.248.145/29 on the PA-200 UNTRUST interface
ethernet1/1. To configure ethernet1/1, go to Network > Interfaces > Ethernet > click ethernet1/1.
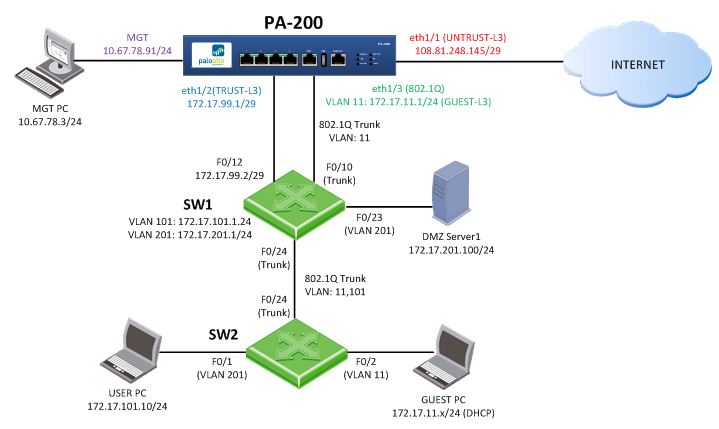

Go to IPv4 tab and
click Static under Type > click Add > type the IP address
108.81.248.145/29 > hit Enter > OK.


You also need to add a static default route by going to Network > Virtual Routers > click LAB-VR > Static Routes > Add.

Type the static route name > type 0.0.0.0/0 under Destination > choose ethernet1/1 under Interface > click IP Address for Next Hop > type the next hop IP address (108.81.248.146 in this case) > click OK.


I've used Abyss web server which is a small
file you can run on a Windows, Mac or Linux PC. I’ve downloaded the Windows
X1 version which is free (X2 is the paid professional version). Double-click the exe file to run the installation wizard, click I Agree and follow the installation wizard.

You'll need to allow the program in Windows firewall by clicking Allow Access.

Create a user login
and password > click OK.

You can modify the web server settings such as the HTTP or HTTPS
ports by clicking Configure > General. My PC 172.17.101.10 can ping the Web server 172.17.201.100
but can’t open the web browser using HTTP port 80. The Abyss Web Server Status
indicated a Listening Error so I changed HTTP port to 8080.


Choose 8080 on the HTTP Port drop-down option.

Click OK and Restart.

The Status has now changed to Listening.


You can also run the built-in Internet Information Services (IIS) (in Windows 7) by going to Control Panel > Programs > Turn Windows features on or off (takes a while to open) > click Internet Information Services (takes a while again to enable).


Now you can configure Destination NAT (Static NAT) on a PAN
firewall and map a public IP address to a private IP address (usually used on
servers). Create first an object for the Web server under Objects > Addresses > Add.

Type the name of the
object (WEB-SERVER-PRIV) > optionally add a Description > choose IP
Netmask under Type > type the private IP address 172.17.201.100 > click
OK. An IP address without a netmask will automatically use a host netmask of /32 (255.255.255.255).

Add another Object for the Web server’s public IP address
108.81.248.147 (also using a host netmask /32).


To configure the Destination NAT policy, go to Policies > NAT > Add.

You configure Destination NAT from left to right just like in a Source NAT
configuration. Under General > type
the NAT policy name (DESTINATION-NAT-WEB) and optionally add a Description.

Under Original Packet
> click Add under Source Zone and choose TRUST-L3 > Under Destination Zone
choose UNTRUST-L3 > under Destination Interface choose ethernet1/1 >
under Source Address choose the object for the Web server’s private IP address
(WEB-SERVER-PRIV) > leave Any under Destination Address.

Under Translated
Packet > choose Static IP under Translation Type.

Choose the object for the Web server’s public IP address (WEB-SERVER-PUB) under Translated
Address.

Click Bi-directional
> then click OK.


You also need a Security rule to allow web
traffic from the UNTRUST zone (Internet) going to the Web server on the TRUST zone under Policies > Security > Add.
Under General tab >
type the Name of the Security rule (INTERNET-TO-WEB-SERVER) and optionally add
a Description.

Under Source tab >
choose UNTRUST-L3 under Source Zone and Any under Source Address (any address
coming from the Internet).

Under Destination tab
> choose TRUST-L3 under Destination Zone > choose the object for Web
server’s public IP address (WEB-SERVER-PUB).


Go to Source/URL Category > under Service click Add >
choose service-http.


Leave the defaults under Actions tab which are Allow and Log
at Session End.

Click OK and then Commit.

I've simulated a host on the UNTRUST zone and used a public IP address of 108.81.248.146/29. I also created a hostfile to resolve DNS on your PC by opening Notepad (right-click and Run as Administrator) > under File Name type: C:\Windows\System32\Drivers\etc\hosts > Open


You can view successful Inbound traffic (UNTRUST-L3 to TRUST-L3 zone) under Monitor > Logs > Traffic. Notice there was a hit on the Inbound Security rule (INTERNET-TO-WEB-SERVER).


No comments:
Post a Comment